Vegan Sushi Bake Recipe
Introduction
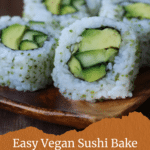
Vegan Sushi Bake is a delicious and comforting twist on traditional sushi, easy to prepare at home. Layers of seasoned sushi rice and spicy vegan mayo come together in a warm, flavorful casserole that’s perfect for sharing.

Ingredients
- 2 cups cooked short-grain sushi rice
- 3 tablespoons rice vinegar
- 1 tablespoon sugar
- 1 teaspoon salt
- 1/2 cup vegan mayonnaise
- 2 tablespoons sriracha sauce
- 1 tablespoon soy sauce or tamari
- 1 small cucumber, diced
- 1 small carrot, shredded
- 1 ripe avocado, diced
- 2 stalks green onions, chopped
- 1 tablespoon toasted sesame seeds
- 2 nori sheets, crumbled or cut into strips
- 1 teaspoon lemon juice (optional)
Instructions
- Step 1: Preheat your oven to 375°F and lightly grease a baking dish.
- Step 2: In a bowl, mix the cooked rice with rice vinegar, sugar, and salt until well combined.
- Step 3: In another bowl, whisk together the vegan mayonnaise, sriracha sauce, and soy sauce until smooth.
- Step 4: Spread the seasoned rice evenly in the prepared baking dish, pressing it down gently to create an even layer.
- Step 5: Spoon the spicy mayo mixture over the rice and smooth it out evenly with a spatula.
- Step 6: Sprinkle shredded carrots and diced cucumbers evenly over the mayo layer.
- Step 7: Bake in the oven for 12 to 15 minutes, until the top is bubbling and golden at the edges.
- Step 8: Remove from the oven and let it sit for 5 minutes to cool slightly.
- Step 9: Top with diced avocado, chopped green onions, toasted sesame seeds, and crumbled nori sheets. Add lemon juice if desired for extra brightness.
- Step 10: Scoop and serve warm, enjoying this flavorful vegan sushi twist.
Tips & Variations
- Use short-grain sushi rice for the best texture; rinse it well before cooking to remove excess starch.
- Adjust the sriracha amount to control heat level according to your taste.
- Try adding other vegetables like thinly sliced bell peppers or edamame for extra color and nutrition.
- For a nutty flavor, drizzle a bit of toasted sesame oil over the rice before spreading the mayo layer.
- Serve with extra soy sauce or pickled ginger on the side for an authentic sushi experience.
Storage
Store leftover sushi bake covered in the refrigerator for up to 2 days. Reheat gently in the oven at 350°F for 10 minutes or until warmed through. Avoid microwaving to preserve texture and flavor.
How to Serve
Serve this delicious recipe with your favorite sides.
FAQs
Can I make this recipe gluten-free?
Yes, simply use tamari instead of regular soy sauce to keep it gluten-free.
Is it necessary to bake the sushi bake?
Baking helps meld the flavors and warm the dish for a comforting experience, but you can serve it chilled or at room temperature if you prefer.
PrintVegan Sushi Bake Recipe

This Vegan Sushi Bake is a delightful, plant-based twist on traditional sushi, combining seasoned sushi rice with a spicy vegan mayo topping, fresh vegetables, and crispy nori, all baked to perfection. It’s an easy-to-make, comforting casserole-style dish that’s perfect for sharing and satisfying sushi cravings without rolling.
- Prep Time: 15 minutes
- Cook Time: 15 minutes
- Total Time: 30 minutes
- Yield: 4 servings 1x
- Category: Main Dish
- Method: Baking
- Cuisine: Japanese-inspired
- Diet: Vegan
Ingredients
Rice Base
- 2 cups cooked short-grain sushi rice
- 3 tablespoons rice vinegar
- 1 tablespoon sugar
- 1 teaspoon salt
Spicy Vegan Mayo Topping
- 1/2 cup vegan mayonnaise
- 2 tablespoons sriracha sauce
- 1 tablespoon soy sauce or tamari
Vegetable Toppings
- 1 small cucumber, diced
- 1 small carrot, shredded
- 1 ripe avocado, diced
- 2 stalks green onions, chopped
- 1 tablespoon toasted sesame seeds
- 2 nori sheets, crumbled or cut into strips
- 1 teaspoon lemon juice (optional)
Instructions
- Prepare Oven and Dish: Preheat your oven to 375°F (190°C) and lightly grease a baking dish to prevent sticking and ensure easy serving.
- Season Rice: In a bowl, combine the cooked sushi rice with rice vinegar, sugar, and salt, mixing well to evenly season the rice and enhance its flavor.
- Make Spicy Mayo: In a separate bowl, whisk together the vegan mayonnaise, sriracha sauce, and soy sauce (or tamari) until smooth and well combined for a creamy, spicy topping.
- Assemble the Base Layer: Spread the seasoned rice evenly in the prepared baking dish, pressing it down gently to form a compact and even layer.
- Add Spicy Mayo Layer: Spoon the spicy vegan mayo mixture over the rice and smooth it out to cover the surface uniformly.
- Top with Vegetables: Sprinkle shredded carrots and diced cucumbers evenly over the mayo layer to add freshness and texture.
- Bake the Sushi: Place the baking dish in the preheated oven and bake for 12 to 15 minutes until the top is bubbling and the edges turn golden brown.
- Rest After Baking: Remove the dish from the oven and let it sit for 5 minutes to let the flavors settle and make it easier to serve.
- Garnish and Finish: Top the baked sushi with diced avocado, chopped green onions, toasted sesame seeds, and crumbled or cut nori sheets. Optionally, sprinkle with lemon juice for brightness.
- Serve Warm: Scoop portions of the sushi bake warm onto plates and enjoy immediately for the best taste and texture.
Notes
- Use short-grain sushi rice for the best texture and stickiness.
- Adjust sriracha to taste for milder or spicier heat.
- Vegan mayonnaise can be substituted with regular mayo if not strictly vegan.
- Fresh vegetables add a nice crunch; avoid watery veggies to prevent sogginess.
- This dish can be served as a main or appetizer and pairs well with soy sauce or pickled ginger on the side.
Keywords: vegan sushi bake, sushi casserole, spicy vegan sushi, baked sushi, easy sushi recipe, plant-based sushi, vegan dinner, sushi without rolling